|
See our Walk-Through tutorials within this Chapter for specific how-to information for installing our components.
WinUI (.NET 10)
Add the control to your WinUI project either way:
NuGet - right-click Dependencies in Solution Explorer and select [Manage NuGet Packages...], with package source [Gigasoft (Local)] or nuget.org. The WinUI package is ProEssentials.Chart.Net10.WinUI. Direct reference - point the project Reference / Hint Path at Gigasoft.ProEssentialsWinUI.Dll in our DotNet10 folder, as our example projects demonstrate. Keep Gigasoft.ProEssentialsWinUI.pri beside the DLL; it carries the control's XAML resources.
Then declare the namespace and place a chart in your XAML:
xmlns:pe="using:Gigasoft.ProEssentials"
<pe:PegoWinUI x:Name="Pego1" />
WinUI has no Toolbox and no drag-and-drop designer - and nothing is wrong with your installation. Microsoft's Visual Studio XAML Designer (the drag-and-drop Design tab) does not support WinUI 3 projects in any Visual Studio version, including VS 2026. If you open a .xaml file and see only the XML editor, with an empty Toolbox, that is expected: with no design surface, there is nothing to drag onto. This is a Microsoft platform decision, not a ProEssentials limitation, and it applies equally to every WinUI control from every vendor.
Microsoft's replacement is a set of XAML runtime design tools, and for a chart they are arguably better than a design surface ever was: rather than a static design-time approximation, you iterate against your real chart, rendering your real data. Start the app with F5 so the debugger attaches (Ctrl+F5 disables these tools), then use:
XAML Hot Reload | Edit any .xaml file while the app runs and the chart updates in about a second, with no restart. |
XAML Live Preview | Renders your running app inside a Visual Studio tab. Debug > Windows > XAML Live Preview. |
Live Visual Tree | Browse the running element tree, and click any element in the app to select it. Debug > Windows > Live Visual Tree. |
Live Property Explorer | View and edit properties on the selected element at run time. Debug > Windows > Live Property Explorer. |
This suits ProEssentials well. A chart is driven by your data and by our PExxx properties in code, so a design surface never showed a realistic chart anyway - Hot Reload shows you the actual rendered result. Microsoft's free WinUI 3 Gallery app is also a handy catalog of the stock WinUI controls with copy-ready XAML. See Chapter 3 WinUI Walkthrough for a step by step example, and .NET Deployment before you ship.
WPF and Winforms (.NET 10 and .NET 8)
Install via NuGet - right-click Dependencies in Solution Explorer and select [Manage NuGet Packages...], with package source [Gigasoft (Local)] or nuget.org - or point the project Reference / Hint Path at our assembly in the DotNet10 or DotNet80 folder.
Note, for modern .NET, and even for .NET Framework, we recommend avoiding the IDE tool palette. Simply update the project's Reference / Hint Path to point at our assemblies, as our example projects demonstrate. This keeps the run-time requirement explicit and sidesteps Toolbox version confusion.
Unlike WinUI, WPF and Winforms do have a Visual Studio design surface, so our controls render inside the designer once referenced.
.NET Framework (net472) - the classic Choose Toolbox Items flow
The old-school route still works exactly as it always has. Our .NET Framework assemblies target net472, so they run on .NET Framework 4.7.2 and later including 4.8, and are installed in our DotNet48 folder. Within a Visual Studio project, under the Tools menu, select [Choose Toolbox Items...], then use the Browse button to select Gigasoft.ProEssentialsWpf.dll (WPF) or Gigasoft.ProEssentials.dll (Winforms).
Once installed, ProEssentials components will be added to the toolbox palette.
Installing WPF interfaces will add 5 components:
Installing WinForm interfaces will add 5 components:
-
Pego (graph)
Pesgo (scientific graph)
Pe3do (3d graph)
Pepso (polar/smith/rose)
Pepco (pie chart)
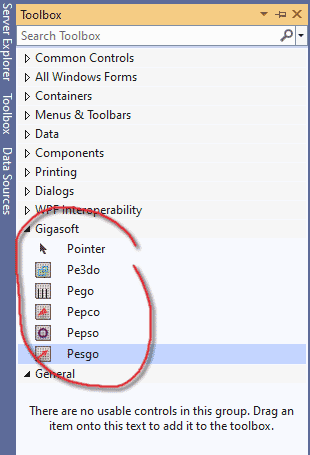
Installing WebForm interfaces will add 6 components:
Visual Studio and design-time bitness
At design time the IDE loads our assembly into its own process, so the assembly must match the IDE's bitness. VS 2026 and VS2022 are 64 bit IDEs, so our x64 or AnyCpu assemblies are required for design time. VS2019 and earlier are 32 bit IDEs, so our x86 or AnyCpu assemblies are required for design time. This affects design time only; see .NET Deployment for what to distribute. Note that the AnyCpu assembly binds a generic-named engine; the setup installs a matching PEGRPI.DLL in the Windows system folder so an AnyCpu control can be placed on a form in the designer.
|


